- All
- Product Name
- Product Keyword
- Product Model
- Product Summary
- Product Description
- Multi Field Search


1. Purpose
The digital force gauge with compact size, high accuracy, they are easy to operate and handy to carry out. Widely applied in electron, high & low voltage electrical appliance, hardware, automobile parts, lighter and ignition system, light industry, mechanical, textile, and so on industries for testing of pull or push load test, insertion force or pull and destructive experiment. This digital force gauge is new generation pulls the pressure measuring instrument.
2. Functional characteristics
1. High precision and high resolution.
2. Five testing modes and three display methods for selection(enhance testing efficiency to the maximum extent).
3. N(Newton),Kg (Kilogram) and Lb (Pound) three measuring units for selection and conversion.
4. Setting function of gravity acceleration----User can input at your option the accurate value of gravity acceleration at the using place so as to make the testing and unit conversion be more accurate.
5. Function of peak value maintaining. Maintain the display of peak value until manual zero clearing.
6. Automatic PEAK function:can set up automatic PEAK time,from 1-9999 seconds.
7. Max. and min. and comparison value can be set for statistic analysis. The buzzer will alarm if exceeding comparison value.
8. Data storage function. 447 testing values can be stored.
9. Data output function. The data can be input into computer through data line for various analyses.
10. Environmental protection. The device will automatically stop if no operation within 10 minutes.If the automatic shutdown is set to 0,the instrument will not shut down.
11. High quality chargeable power supply. The charging voltage is available from 100V to 240V, which can accommodate most areas in domestic and at abroad. It has also protection functions for short circuit, leakage and overload.
12. Special testing function of make-break ability of switch contact to make the make-break testing be more accurate.
13. 6 digits large screen display.
14. Low battery detection shutdown,when the battery is running low,the instrument will automatically put-off,it can prevent the low battery caused by Inaccurate measurement.
3. Structure chart

S type sensor

Range | Size/mm | ||||
Equivalent | D | L | H | B | |
50~500N | 5~50Kg | M8 | 51 | 64 | 12.7 |
1K~5KN | 100~500Kg | M12 | 51 | 76 | 19.1 |
10KN | 1t | M12 | 51 | 76 | 25.4 |
20~50KN | 2~5t | M20 | 76 | 108 | 25.4 |
100KN | 10t | M30 | 127 | 178 | 51 |
200KN | 20t | M36×3 | 140 | 188 | 60 |

Spoke Sensor
Range | Size/mm | |||||||
Equivalent | ΦA | ΦB | ΦC | ΦF | MD | H | E | |
5000N~50KN | 500Kg~5t | 105 | 88.9 | 6.5 | 32 | M16×1.5 | 37 | 34 |
100、200KN | 10~20t | 125 | 101.6 | 8.5 | 39 | M32×1.5 | 52 | 48 |
500KN | 50t | 145 | 116.8 | 10.5 | 50 | M40×1.5 | 58 | 54 |
1000KN | 100t | 205 | 162 | 12.5 | 80 | M60×2 | 85 | 78 |

Column type sensor(Internal thread)
Range | Size/mm | ||||||
Equivalent | A | H | φB | φ | M | C | |
1000~5000N | 100~500Kg | 88 | 58 | 28 | 44 | 16×1.5 | 26 |
10~50 | 1~5t | 120 | 68 | 51 | 63 | 22 | 48 |
100 | 10t | 138 | 94 | 60 | 76 | 30 | 56 |
200 | 20t | 156 | 108 | 68.5 | 88 | 36×3 | 76 |

Column type sensor(External thread)
KN | Equivalent(T) | A | ΦB | C | M |
100~200 | 10~20 | 214 | 86 | 124 | M42×4.5 |
500 | 50 | 276 | 106 | 156 | M56×5.5 |
1000 | 100 | 380 | 142 | 180 | M90×6 |
2000 | 200 | 500 | 175 | 220 | M140×10 |
4. Force gauge model specification sheet
Model | 2 | 3 | 5 | 10 | 20 | 30 | 50 | 100 | 200 | 300 | 500 | 1000 | ||
Peak load value | 2N | 3N | 5N | 10N | 20N | 30N | 50N | 100N | 200N | 300N | 500N | 1000N | ||
0.2kg | 0.3kg | 0.5kg | 1kg | 2kg | 3kg | 5kg | 10kg | 20kg | 30kg | 50kg | 100kg | |||
0.45Lb | 0.65Lb | 1.1Lb | 2.2Lb | 4.5Lb | 6.5Lb | 11Lb | 22Lb | 45Lb | 65Lb | 110Lb | 220Lb | |||
load division value | 0.001N | 0.01N | 0.1N | |||||||||||
0.0001kg | 0.001kg | 0.01kg | ||||||||||||
0.0001Lb | 0.001Lb | 0.01Lb | ||||||||||||
Sensor structure | Inner sensor | Inner/outside | ||||||||||||
Accuracy | ±0.5% | ±1% | ||||||||||||
Power | 7.2V 1.2V×6 NiMH batteries | |||||||||||||
Data interface | RS 232 nine-hole socket | |||||||||||||
Charging time | 4~6 hours | |||||||||||||
The battery of continuous use of time | About 15 hours | |||||||||||||
Battery Life | ≥300 times | |||||||||||||
Charger | Input:AC 100-240V 50HZ Output:DC 12V 500mA | |||||||||||||
Working temperature | 5℃~35℃ | |||||||||||||
Transport temperature | -10℃~60℃ | |||||||||||||
Relative humidity | 15%~80%RH | |||||||||||||
Working conditions | No hypocenter and corrosive medium | |||||||||||||
Model | 1000 | 2000 | 3000 | 5000 | 10k | 20k | 30k | 50k | 100k | 200k | 300k | 500k | 1000k | 2000k | |
Peak load value | 1000N | 2000N | 3000N | 5000N | 10KN | 20KN | 30KN | 50KN | 100KN | 200KN | 300KN | 500KN | 1000KN | 2000KN | |
100kg | 200kg | 300kg | 500kg | 1Kkg | 2Kkg | 3Kkg | 5Kkg | 10Kkg | 20Kkg | 30Kkg | 50Kkg | 100Kkg | 200Kkg | ||
220Lb | 450Lb | 650Lb | 1100Lb | 2.2KLb | 4.5KLb | 6.5KLb | 11KLb | 22KLb | 45KLb | 65KLb | 110KLb | 220KLb | 450KLb | ||
load division value | 0.1N | 1N | 0.001KN | 0.01KN | 0.1KN | 1KN | |||||||||
0.01kg | 0.1Kg | 0.0001KKg | 0.001KKg | 0.01KKg | 0.1KKg | ||||||||||
0.01Lb | 0.1Lb | 0.0001KLb | 0.001KLb | 0.01KLb | 0.1KLb | ||||||||||
Sensor structure | Inner/External Sensor | External sensor | |||||||||||||
Accuracy | ±1% | ||||||||||||||
Data interface | RS 232 nine-hole socket | ||||||||||||||
Power | 7.2V 1.2V×6 NiMH batteries | ||||||||||||||
Charging time | 4~6 hours | ||||||||||||||
The battery of continuous use of time | About 15 hours | ||||||||||||||
Battery Life | ≥300 times | ||||||||||||||
Charger | Input:AC 100-240V 50HZ Output:DC 12V 500mA | ||||||||||||||
Working temperature | 5℃~35℃ | ||||||||||||||
Transport temperature | -10℃~60℃ | ||||||||||||||
Relative humidity | 15%~80%RH | ||||||||||||||
Working conditions | No hypocenter and corrosive medium | ||||||||||||||
5. Screen display

① Three modes display:after the boot,the screen not show any number,it is means “track mode”(Real-time load value mode), the value on the screen will change accordingly with the load.Then press”PEAK” key,the screen display ”PEAK”,it is means “peak mode” (Peak maintaining mode), and the displayer will maintain the display the peak value until manual zero clearing.Then press”PEAK” key,the screen display "auto peak" (Automatic release mode of peak maintaining), and the display of peak value will be stored, maintained for 10 seconds and then is cleared automatically. The 10 seconds time can be set automatically. (Refer to the below (PE.SET) to get more information.)
② Have/No data stored show: If the data is stored and memorized, "MEM" will be displayed. When pressing "CHECK" button to check memorized data, "MEM" will flash.
③ Push/pull show: In this gauge, push ( tension ) is negative value(“-”), pull value is positive value (“+”not display )
④ Comparative function:When setting comparative value through STOP(According to the below (STOP) machine stop value description) the function is activated. "CMP" displays, it can be set according to demand when using.
⑤ Display measuring value
⑥Lower limit/ upper limit show : When screen display”MIN”,it is means measurement data achieve and below the lower limit;when screen display”MAX”,it is means measurement data achieve and above the upper limit.
⑦ Three units display:N (Newton), kg (Kilogram) and lb (Pound) three measuring units for selection and conversion.If above 10K,now the screen display KN,KKG,KLB.
⑧Power display:When the battery voltage is below 7.0 V,it shows low-voltage,needs recharge(you also can test when charge).There is a power light above the ON button,when charge, the indicator become from red to green,repeat this process twice,it is means charge as normal, then the indicator is red. When the battery is full,the indicator turn to green.If don't use the device for a longtime and the battery is so low, plug in the charger,the indicator maybe not on shine, after 30 minutes,the indicator will show red,charging time is about 4 ~ 6 hours.(We advice you charge the gauge at least once during half a year when you do not use in stock to keep the battery good work)
6. Button introduction

1 ON button
Press the button, and the power will be on and the model will be displayed. After the apparatus is started, before zero clearing by pressing Zero button, the screen may display similar signal of drifting zero point value, just press Zero button to clear.
2 OFF button
Whenever the button is pressed, the power is cut off. The memorized data will never disappear.( When turn on gauge, show types no show testing interface 0.00, click OFF button not have response.
3 SAVE button
In peck interface, click this button, will store the testing data, in function setting interface, click this button can save the set parameter. When the test data is stored,the "MEM" will appear. The instrument can store 447 data.
4 SET button
Detailed setting refer to "Function introduction".
5 UNIT button
Press this button to carry out conversion between measuring units. Three units such as N (Newton), kg (Kilogram) and lb (Pound) can be displayed circularly. Under the display status of testing data, the unit conversion of the same value can be completed. In the specifications above 10K, the units can be combined with the alphabet "K" into “KN (Kilo-Newton)", "KKG(Ton)" and "KLB (Kilo-pound)".
6 PEAK button
Press this button each time, the switching of display of "PEAK", display of "AUTO PEAK" and disappearance of "PEAK" can be realized. That is, the switching of peak value maintaining, automatic release of peak value maintaining and real-time load value mode.
7 ROTATE button
This key is only effective in testing interface,when press this button,measured value display will be rotated 180 degrees.
8 CHECK button
When pressing this button, the stored testing data will be displayed on the screen. “MEM” words flashing.
First show stored times, after 2 seconds automatically show stored data. Press ZERO button back to testing interface.
9 ZERO button
After pressing this button, the testing value on the screen will be cleared.
Note:
• when need clear the gauge, can only in real-time testing interface. In Peak interface and Auto peak interface can not clear the gauge
• Select lighter fixtures or remove the added load to clear again.
• In Checking interface, press this button for 4 seconds, all stored testing data will be completely cleared. (Under some conditions, the clearing may not be completed. Power off and power on again to execute the function, all the memorized data can be cleared.)
7. On display

Full screen flicker Model Measurement interface
8. Function introduction
Setting function
a. Model switch:After the boot,press “SET” button,the screen display “TEST”,then press “SET” button again,the screen display 0001 model,you can press “ ▲ ”button choose different models. See the chart below

0001 standard testing mode 0002 push-pull peak value mode
0003 push peak value mode 0004pull peak value mode
0005 external contact break-make mode 0006external contact make-break mode
0001 standard testing mode (Default ex-factory mode)Under the mode, three kinds of status can be setted, that is, real-time load value status, peak value maintaining status and automatic peak value status. When there is no "PEAK" on the screen, it is under real-time load value status. The testing value will change accordingly with load. Press Peak button, "PEAK" will be displayed, and it is under peak maintaining status. The testing value displayed is the maximum value in the test (Whatever pull and push force). It requires manual clearing. Press PEAK button again, "AUTO PEAK" will be displayed, and it is under automatic peak status. The testing value displayed is the maximum value in the test (Whatever pull and push force), and after 2 seconds display, the value will automatically disappear and be cleared. Enter into next test.
0002 push-pull peak value mode-----Seize the function of maximum load value at the two directions of push and pull force. During connector testing, seize the insertion force maximum load value of positive and negative directions of push/pull force.
0003 push peak value mode-----During insertion force testing, just seize the maximum load of push force.
0004 pull peak value mode-----During insertion force testing, just seize the maximum load of pull force.
0005 0006 switch On and off force testing mode-----Measure the accurate load value of Contact on-off action.
0005 Instant maximum force of external contact from breaking to making.Connect the 2 tested contacts separately into 4 and 5 feet on the data interface (Through data plug in the accessories), press PEAK button to select peak mode, exert pressure onto the switch with push-pull force meter until the switch is connected. The force value measured at the time is the force value required for making the switch.
0006 Instant maximum force of external contact from making to breaking.Connect the 2 tested contacts separately into 4 and 5 feet on the data interface (Through data plug in the accessories), press PEAK button to select peak mode, exert pressure onto the switch with push-pull force meter until the switch is disconnected. The force value measured at the time is the force value required for breaking the switch.
b. The other setting options
After the boot,press “SET” button,the screen display “TEST”,then press “▲”button,you can check setting options.The screen successively display “HIDT”, “LODT”, “STOP”, “LOSET”, “OFFT”, “PE.SET”, “GSET”, “BACSET”, “RESET”.See the chart below

(HIDT) Upper Limit Setting:Set the Max. of testing value, ,the default value is 99% of full range, if a value is higher than Max range 99%, the value will exceed the range and "MAX" will be displayed.If you want to reset the max value,you can choose “▲” and “►” to set.selected the "SAVE" button save and enter the next step set project.

LODT Lower Limit Setting:Set the Min. of testing value,the default value is 0.If a value is lower than Min., the value will exceed the range and "MIN" will be displayed.If you want to reset the min value,same as HIDI set.Then selected the "SAVE" button save and enter the next step set project.
(STOP) Machine Stop Value Setting:The default state for 99% of full scale,used with our electric machines. When the test value more than the machine stop setting value,the force gauge output a 5V signal,then the machine receive the signal.
This function method of operation:
a. First setting the machine stop value:Setting method:Switch on, wait for displaying measuring interface,press “SET” button into machine stop value settings(display (STOP)),set its value to the preset value.
b. There is s single output hub(see details of above”Structure chart”), insert a head of the signal output line to the single output hub, the other head to single input socket of test stand(The signal output line is the standard accessories of electric test stand)
c. Start the electric test stand , then the test force more than the machine stop value, can realize the function of motor automatically shut down.
(LOSET)The Min. Peak Value:in PEAK model,the current value is less than this value,the value can’t be stored.
(OFFT)Setting of Automatic shutdown time:In this setting project,using “▲”to choose,automatic shutdown can be set from 10 minutes to 90 minutes,also can be set "00" don’t automatic shutdown.If choose not to automatic shutdown,you can press”SAVE”button after the selected.Then return to option interface.Instrument default setting is 10 minutes.
(PE.SET)Auto Peak save time,unit show in seconds,the default value is 10,this value can not be set to 0.
(G.SET)Setting the acceleration of gravity:According to the position of the region set gravity acceleration value,the default value is 9.8000
(BACSET)Setting of back light:In this setting project,using “▲” to choose,if choose “(YES)”,it is means open the back light function;if choose “(NO)”,it is means close the back light,after you choose,please press “SAVE”button and return to setting interface.
(RESET)Restore factory Settings: Turn on the gauge, when in testing interface, click set button, then click check button, at last click set button, the gauge will shut down itself, If using, restart the gauge again.
9. Testing
1. Press ON button to start, can use the gauge directly by using factory default Setting or press SET button to choose the testing mode.
2. Choose proper measuring clamp and install clamp to force gauge( Custom-made clamp should refer to relevant data of "Structure chart and Outline/ mounting dimension chart ")
3. After testing, un-load and close power, take off clamp, then clean kinds of goods and replace to toolbox in case next using.
10. To store data and connect the computer
1 Store Date
Press “SAVE” to store the testing data, the stored data is the screen display data, show“MEM”on LCD, stored data can also be saved after shutdown. Using”CHECK” button to check the stored data.”MEM”flashing, first show the stored times, after 2 seconds show stored data automatically,. Press “ZERO” to exit saved directly into the test. Also can input data into computer for analysis. The instrument can store 447 data.If more than 447, the data will not be saved.
2 Clear the data
When in Checking interface,press “ZERO” button above 4 seconds,all the data will be removed,the “MEM” will disappear.
3 Connect the computer introduce
a. Using CD《The data export program》to output the stored data to computer. Checking, printing,testing times, average value, Max. Value, Min. Value, to identify whether test results conform to the requirements.(see details in 《The data export program》)
b. Using CD《The synchronous test》to implement graph of force value and time. (see details in 《The synchronous test》)
11. Safety Precautions
1 Notice:
a. It should be charged 4-6 hours later then could be used after purchased the instrument.
b. The users must use the RS232 connection lines which allotted by our company.
c. The instrument may damaged by wrong operation. This manual point out the ways to prevent it from damage, so please read it carefully and keep it well after reading.
d. If it is testing impact load, please choose the twice bigger force models of the required maximum impact load.
2 Warning:
a. Please make any safeguard during testing, such as wear protecting mask and glove.
b. Don't use the damaged clamps. Custom clamps please reference related parameters of the manual. (We also produce many kinds of clamps, the users could purchase as they request)
c. Please don't use the instrument if the actual value exceed the full scale, or the sensor would be damaged and make any accident.
d. When the testing value exceed 100% of the full scale, the instrument will be warning automatically, in this case, please quickly release the load or reduce the load.When the testing value exceed 120% of the full scale, the instrument may be damaged.
3 Solve the problem of system halted: When the system was halted, please use an pointer to press the "reset" button( on the left side of the instrument). Then it would be OK.
4 Safety Precautions
a. Please use the matched charger when it's need to charge, or it may case any circuit fault and fire hazard.
b. Don't use the other charger which the voltage is out of the rated voltage. or it may case any electric shock and fire hazard.
c. Don't pull out or insert the plug with wet hands,may cause electric shock.
d. Don't drag the wire of the charger to pull out the plug.
e. Please use soft cloth to clean the instrument, don't use any volatile chemicals to clean the instrument.(such as volatile agent, thinner, alcohol, etc.)
f. Please don't use the instrument at the following place:
① Wet place ② Dusty place ③Somewhere with much oil or chemicals ④ seismic place
g. Please use and restore it with the place of provision temperature and humidity, or it may be damaged.
h. Don't repair it by yourself, or it may case the machine permanent fault.
i. Please confirmed the fault before sending for repair.
j. The confirmation of project before repairing
Power | symptom | Cause or phenomenon | Treatment |
Press power on key has no display | Batteries has no electricity | Recharge | |
Can't charge | Converter of un-conformity when charging | Please affirm: AC110V→DC9.4V AC220V→DC9.4V | |
Indicator not on when charging | The battery is low,need a charging time of awakening | When the indicator not on,you can charge about 30 minutes.If the instrument is okay,the indicator will be on. | |
Testing value | Inaccurate testing value | Error is too big | Should be returned to the factory correction |
Other | Accident System halted | Has no reflection by pressing any key | Press "reset"key |
12. Data interface (9PIN)

PIN | Function |
PIN4 PIN5 | Contact Point Signal |
PIN2 PIN3 PIN5 | RS232 interface to computer |
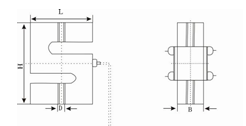
13. Outline and mounting dimension chart

14. Packing list
Charger | Compressed clamp | Stretching clamp | Extended bar | Mounting screw | Manual | Inspection certificate | |
2 | 1 | 4 | 1 | 1 | 4 | 1 | 1 |
3 | 1 | 4 | 1 | 1 | 4 | 1 | 1 |
5 | 1 | 4 | 1 | 1 | 4 | 1 | 1 |
10 | 1 | 4 | 1 | 1 | 4 | 1 | 1 |
20 | 1 | 4 | 1 | 1 | 4 | 1 | 1 |
30 | 1 | 4 | 1 | 1 | 4 | 1 | 1 |
50 | 1 | 4 | 1 | 1 | 4 | 1 | 1 |
100 | 1 | 4 | 1 | 1 | 4 | 1 | 1 |
200 | 1 | 4 | 1 | 1 | 4 | 1 | 1 |
300 | 1 | 4 | 1 | 1 | 4 | 1 | 1 |
500 | 1 | 4 | 1 | 1 | 4 | 1 | 1 |
1000 (built-in) | 1 | 4 | 1 | 1 | 4 | 1 | 1 |
1000(external) | 1 | 3 | 2 | - | 4 | 1 | 1 |
2000 | 1 | 3 | 2 | - | 4 | 1 | 1 |
3000 | 1 | 3 | 2 | - | 4 | 1 | 1 |
5000 | 1 | 3 | 2 | - | 4 | 1 | 1 |
10K | 1 | 3 | 2 | - | 4 | 1 | 1 |
20K | 1 | 3 | 2 | - | 4 | 1 | 1 |
30K | 1 | 3 | 2 | - | 4 | 1 | 1 |
50K | 1 | 3 | 2 | - | 4 | 1 | 1 |
100K | 1 | - | - | - | 4 | 1 | 1 |
200K | 1 | - | - | - | 4 | 1 | 1 |
300K | 1 | - | - | - | 4 | 1 | 1 |
500K | 1 | - | - | - | 4 | 1 | 1 |
1000K | 1 | - | - | - | 4 | 1 | 1 |
2000K | 1 | - | - | - | 4 | 1 | 1 |
1. Purpose
The digital force gauge with compact size, high accuracy, they are easy to operate and handy to carry out. Widely applied in electron, high & low voltage electrical appliance, hardware, automobile parts, lighter and ignition system, light industry, mechanical, textile, and so on industries for testing of pull or push load test, insertion force or pull and destructive experiment. This digital force gauge is new generation pulls the pressure measuring instrument.
2. Functional characteristics
1. High precision and high resolution.
2. Five testing modes and three display methods for selection(enhance testing efficiency to the maximum extent).
3. N(Newton),Kg (Kilogram) and Lb (Pound) three measuring units for selection and conversion.
4. Setting function of gravity acceleration----User can input at your option the accurate value of gravity acceleration at the using place so as to make the testing and unit conversion be more accurate.
5. Function of peak value maintaining. Maintain the display of peak value until manual zero clearing.
6. Automatic PEAK function:can set up automatic PEAK time,from 1-9999 seconds.
7. Max. and min. and comparison value can be set for statistic analysis. The buzzer will alarm if exceeding comparison value.
8. Data storage function. 447 testing values can be stored.
9. Data output function. The data can be input into computer through data line for various analyses.
10. Environmental protection. The device will automatically stop if no operation within 10 minutes.If the automatic shutdown is set to 0,the instrument will not shut down.
11. High quality chargeable power supply. The charging voltage is available from 100V to 240V, which can accommodate most areas in domestic and at abroad. It has also protection functions for short circuit, leakage and overload.
12. Special testing function of make-break ability of switch contact to make the make-break testing be more accurate.
13. 6 digits large screen display.
14. Low battery detection shutdown,when the battery is running low,the instrument will automatically put-off,it can prevent the low battery caused by Inaccurate measurement.
3. Structure chart
S type sensor
Range | Size/mm | ||||
Equivalent | D | L | H | B | |
50~500N | 5~50Kg | M8 | 51 | 64 | 12.7 |
1K~5KN | 100~500Kg | M12 | 51 | 76 | 19.1 |
10KN | 1t | M12 | 51 | 76 | 25.4 |
20~50KN | 2~5t | M20 | 76 | 108 | 25.4 |
100KN | 10t | M30 | 127 | 178 | 51 |
200KN | 20t | M36×3 | 140 | 188 | 60 |
Spoke Sensor
Range | Size/mm | |||||||
Equivalent | ΦA | ΦB | ΦC | ΦF | MD | H | E | |
5000N~50KN | 500Kg~5t | 105 | 88.9 | 6.5 | 32 | M16×1.5 | 37 | 34 |
100、200KN | 10~20t | 125 | 101.6 | 8.5 | 39 | M32×1.5 | 52 | 48 |
500KN | 50t | 145 | 116.8 | 10.5 | 50 | M40×1.5 | 58 | 54 |
1000KN | 100t | 205 | 162 | 12.5 | 80 | M60×2 | 85 | 78 |
Column type sensor(Internal thread)
Range | Size/mm | ||||||
Equivalent | A | H | φB | φ | M | C | |
1000~5000N | 100~500Kg | 88 | 58 | 28 | 44 | 16×1.5 | 26 |
10~50 | 1~5t | 120 | 68 | 51 | 63 | 22 | 48 |
100 | 10t | 138 | 94 | 60 | 76 | 30 | 56 |
200 | 20t | 156 | 108 | 68.5 | 88 | 36×3 | 76 |
Column type sensor(External thread)
KN | Equivalent(T) | A | ΦB | C | M |
100~200 | 10~20 | 214 | 86 | 124 | M42×4.5 |
500 | 50 | 276 | 106 | 156 | M56×5.5 |
1000 | 100 | 380 | 142 | 180 | M90×6 |
2000 | 200 | 500 | 175 | 220 | M140×10 |
4. Force gauge model specification sheet
Model | 2 | 3 | 5 | 10 | 20 | 30 | 50 | 100 | 200 | 300 | 500 | 1000 | ||
Peak load value | 2N | 3N | 5N | 10N | 20N | 30N | 50N | 100N | 200N | 300N | 500N | 1000N | ||
0.2kg | 0.3kg | 0.5kg | 1kg | 2kg | 3kg | 5kg | 10kg | 20kg | 30kg | 50kg | 100kg | |||
0.45Lb | 0.65Lb | 1.1Lb | 2.2Lb | 4.5Lb | 6.5Lb | 11Lb | 22Lb | 45Lb | 65Lb | 110Lb | 220Lb | |||
load division value | 0.001N | 0.01N | 0.1N | |||||||||||
0.0001kg | 0.001kg | 0.01kg | ||||||||||||
0.0001Lb | 0.001Lb | 0.01Lb | ||||||||||||
Sensor structure | Inner sensor | Inner/outside | ||||||||||||
Accuracy | ±0.5% | ±1% | ||||||||||||
Power | 7.2V 1.2V×6 NiMH batteries | |||||||||||||
Data interface | RS 232 nine-hole socket | |||||||||||||
Charging time | 4~6 hours | |||||||||||||
The battery of continuous use of time | About 15 hours | |||||||||||||
Battery Life | ≥300 times | |||||||||||||
Charger | Input:AC 100-240V 50HZ Output:DC 12V 500mA | |||||||||||||
Working temperature | 5℃~35℃ | |||||||||||||
Transport temperature | -10℃~60℃ | |||||||||||||
Relative humidity | 15%~80%RH | |||||||||||||
Working conditions | No hypocenter and corrosive medium | |||||||||||||
Model | 1000 | 2000 | 3000 | 5000 | 10k | 20k | 30k | 50k | 100k | 200k | 300k | 500k | 1000k | 2000k | |
Peak load value | 1000N | 2000N | 3000N | 5000N | 10KN | 20KN | 30KN | 50KN | 100KN | 200KN | 300KN | 500KN | 1000KN | 2000KN | |
100kg | 200kg | 300kg | 500kg | 1Kkg | 2Kkg | 3Kkg | 5Kkg | 10Kkg | 20Kkg | 30Kkg | 50Kkg | 100Kkg | 200Kkg | ||
220Lb | 450Lb | 650Lb | 1100Lb | 2.2KLb | 4.5KLb | 6.5KLb | 11KLb | 22KLb | 45KLb | 65KLb | 110KLb | 220KLb | 450KLb | ||
load division value | 0.1N | 1N | 0.001KN | 0.01KN | 0.1KN | 1KN | |||||||||
0.01kg | 0.1Kg | 0.0001KKg | 0.001KKg | 0.01KKg | 0.1KKg | ||||||||||
0.01Lb | 0.1Lb | 0.0001KLb | 0.001KLb | 0.01KLb | 0.1KLb | ||||||||||
Sensor structure | Inner/External Sensor | External sensor | |||||||||||||
Accuracy | ±1% | ||||||||||||||
Data interface | RS 232 nine-hole socket | ||||||||||||||
Power | 7.2V 1.2V×6 NiMH batteries | ||||||||||||||
Charging time | 4~6 hours | ||||||||||||||
The battery of continuous use of time | About 15 hours | ||||||||||||||
Battery Life | ≥300 times | ||||||||||||||
Charger | Input:AC 100-240V 50HZ Output:DC 12V 500mA | ||||||||||||||
Working temperature | 5℃~35℃ | ||||||||||||||
Transport temperature | -10℃~60℃ | ||||||||||||||
Relative humidity | 15%~80%RH | ||||||||||||||
Working conditions | No hypocenter and corrosive medium | ||||||||||||||
5. Screen display
① Three modes display:after the boot,the screen not show any number,it is means “track mode”(Real-time load value mode), the value on the screen will change accordingly with the load.Then press”PEAK” key,the screen display ”PEAK”,it is means “peak mode” (Peak maintaining mode), and the displayer will maintain the display the peak value until manual zero clearing.Then press”PEAK” key,the screen display "auto peak" (Automatic release mode of peak maintaining), and the display of peak value will be stored, maintained for 10 seconds and then is cleared automatically. The 10 seconds time can be set automatically. (Refer to the below (PE.SET) to get more information.)
② Have/No data stored show: If the data is stored and memorized, "MEM" will be displayed. When pressing "CHECK" button to check memorized data, "MEM" will flash.
③ Push/pull show: In this gauge, push ( tension ) is negative value(“-”), pull value is positive value (“+”not display )
④ Comparative function:When setting comparative value through STOP(According to the below (STOP) machine stop value description) the function is activated. "CMP" displays, it can be set according to demand when using.
⑤ Display measuring value
⑥Lower limit/ upper limit show : When screen display”MIN”,it is means measurement data achieve and below the lower limit;when screen display”MAX”,it is means measurement data achieve and above the upper limit.
⑦ Three units display:N (Newton), kg (Kilogram) and lb (Pound) three measuring units for selection and conversion.If above 10K,now the screen display KN,KKG,KLB.
⑧Power display:When the battery voltage is below 7.0 V,it shows low-voltage,needs recharge(you also can test when charge).There is a power light above the ON button,when charge, the indicator become from red to green,repeat this process twice,it is means charge as normal, then the indicator is red. When the battery is full,the indicator turn to green.If don't use the device for a longtime and the battery is so low, plug in the charger,the indicator maybe not on shine, after 30 minutes,the indicator will show red,charging time is about 4 ~ 6 hours.(We advice you charge the gauge at least once during half a year when you do not use in stock to keep the battery good work)
6. Button introduction
1 ON button
Press the button, and the power will be on and the model will be displayed. After the apparatus is started, before zero clearing by pressing Zero button, the screen may display similar signal of drifting zero point value, just press Zero button to clear.
2 OFF button
Whenever the button is pressed, the power is cut off. The memorized data will never disappear.( When turn on gauge, show types no show testing interface 0.00, click OFF button not have response.
3 SAVE button
In peck interface, click this button, will store the testing data, in function setting interface, click this button can save the set parameter. When the test data is stored,the "MEM" will appear. The instrument can store 447 data.
4 SET button
Detailed setting refer to "Function introduction".
5 UNIT button
Press this button to carry out conversion between measuring units. Three units such as N (Newton), kg (Kilogram) and lb (Pound) can be displayed circularly. Under the display status of testing data, the unit conversion of the same value can be completed. In the specifications above 10K, the units can be combined with the alphabet "K" into “KN (Kilo-Newton)", "KKG(Ton)" and "KLB (Kilo-pound)".
6 PEAK button
Press this button each time, the switching of display of "PEAK", display of "AUTO PEAK" and disappearance of "PEAK" can be realized. That is, the switching of peak value maintaining, automatic release of peak value maintaining and real-time load value mode.
7 ROTATE button
This key is only effective in testing interface,when press this button,measured value display will be rotated 180 degrees.
8 CHECK button
When pressing this button, the stored testing data will be displayed on the screen. “MEM” words flashing.
First show stored times, after 2 seconds automatically show stored data. Press ZERO button back to testing interface.
9 ZERO button
After pressing this button, the testing value on the screen will be cleared.
Note:
• when need clear the gauge, can only in real-time testing interface. In Peak interface and Auto peak interface can not clear the gauge
• Select lighter fixtures or remove the added load to clear again.
• In Checking interface, press this button for 4 seconds, all stored testing data will be completely cleared. (Under some conditions, the clearing may not be completed. Power off and power on again to execute the function, all the memorized data can be cleared.)
7. On display
Full screen flicker Model Measurement interface
8. Function introduction
Setting function
a. Model switch:After the boot,press “SET” button,the screen display “TEST”,then press “SET” button again,the screen display 0001 model,you can press “ ▲ ”button choose different models. See the chart below
0001 standard testing mode 0002 push-pull peak value mode
0003 push peak value mode 0004pull peak value mode
0005 external contact break-make mode 0006external contact make-break mode
0001 standard testing mode (Default ex-factory mode)Under the mode, three kinds of status can be setted, that is, real-time load value status, peak value maintaining status and automatic peak value status. When there is no "PEAK" on the screen, it is under real-time load value status. The testing value will change accordingly with load. Press Peak button, "PEAK" will be displayed, and it is under peak maintaining status. The testing value displayed is the maximum value in the test (Whatever pull and push force). It requires manual clearing. Press PEAK button again, "AUTO PEAK" will be displayed, and it is under automatic peak status. The testing value displayed is the maximum value in the test (Whatever pull and push force), and after 2 seconds display, the value will automatically disappear and be cleared. Enter into next test.
0002 push-pull peak value mode-----Seize the function of maximum load value at the two directions of push and pull force. During connector testing, seize the insertion force maximum load value of positive and negative directions of push/pull force.
0003 push peak value mode-----During insertion force testing, just seize the maximum load of push force.
0004 pull peak value mode-----During insertion force testing, just seize the maximum load of pull force.
0005 0006 switch On and off force testing mode-----Measure the accurate load value of Contact on-off action.
0005 Instant maximum force of external contact from breaking to making.Connect the 2 tested contacts separately into 4 and 5 feet on the data interface (Through data plug in the accessories), press PEAK button to select peak mode, exert pressure onto the switch with push-pull force meter until the switch is connected. The force value measured at the time is the force value required for making the switch.
0006 Instant maximum force of external contact from making to breaking.Connect the 2 tested contacts separately into 4 and 5 feet on the data interface (Through data plug in the accessories), press PEAK button to select peak mode, exert pressure onto the switch with push-pull force meter until the switch is disconnected. The force value measured at the time is the force value required for breaking the switch.
b. The other setting options
After the boot,press “SET” button,the screen display “TEST”,then press “▲”button,you can check setting options.The screen successively display “HIDT”, “LODT”, “STOP”, “LOSET”, “OFFT”, “PE.SET”, “GSET”, “BACSET”, “RESET”.See the chart below
(HIDT) Upper Limit Setting:Set the Max. of testing value, ,the default value is 99% of full range, if a value is higher than Max range 99%, the value will exceed the range and "MAX" will be displayed.If you want to reset the max value,you can choose “▲” and “►” to set.selected the "SAVE" button save and enter the next step set project.
LODT Lower Limit Setting:Set the Min. of testing value,the default value is 0.If a value is lower than Min., the value will exceed the range and "MIN" will be displayed.If you want to reset the min value,same as HIDI set.Then selected the "SAVE" button save and enter the next step set project.
(STOP) Machine Stop Value Setting:The default state for 99% of full scale,used with our electric machines. When the test value more than the machine stop setting value,the force gauge output a 5V signal,then the machine receive the signal.
This function method of operation:
a. First setting the machine stop value:Setting method:Switch on, wait for displaying measuring interface,press “SET” button into machine stop value settings(display (STOP)),set its value to the preset value.
b. There is s single output hub(see details of above”Structure chart”), insert a head of the signal output line to the single output hub, the other head to single input socket of test stand(The signal output line is the standard accessories of electric test stand)
c. Start the electric test stand , then the test force more than the machine stop value, can realize the function of motor automatically shut down.
(LOSET)The Min. Peak Value:in PEAK model,the current value is less than this value,the value can’t be stored.
(OFFT)Setting of Automatic shutdown time:In this setting project,using “▲”to choose,automatic shutdown can be set from 10 minutes to 90 minutes,also can be set "00" don’t automatic shutdown.If choose not to automatic shutdown,you can press”SAVE”button after the selected.Then return to option interface.Instrument default setting is 10 minutes.
(PE.SET)Auto Peak save time,unit show in seconds,the default value is 10,this value can not be set to 0.
(G.SET)Setting the acceleration of gravity:According to the position of the region set gravity acceleration value,the default value is 9.8000
(BACSET)Setting of back light:In this setting project,using “▲” to choose,if choose “(YES)”,it is means open the back light function;if choose “(NO)”,it is means close the back light,after you choose,please press “SAVE”button and return to setting interface.
(RESET)Restore factory Settings: Turn on the gauge, when in testing interface, click set button, then click check button, at last click set button, the gauge will shut down itself, If using, restart the gauge again.
9. Testing
1. Press ON button to start, can use the gauge directly by using factory default Setting or press SET button to choose the testing mode.
2. Choose proper measuring clamp and install clamp to force gauge( Custom-made clamp should refer to relevant data of "Structure chart and Outline/ mounting dimension chart ")
3. After testing, un-load and close power, take off clamp, then clean kinds of goods and replace to toolbox in case next using.
10. To store data and connect the computer
1 Store Date
Press “SAVE” to store the testing data, the stored data is the screen display data, show“MEM”on LCD, stored data can also be saved after shutdown. Using”CHECK” button to check the stored data.”MEM”flashing, first show the stored times, after 2 seconds show stored data automatically,. Press “ZERO” to exit saved directly into the test. Also can input data into computer for analysis. The instrument can store 447 data.If more than 447, the data will not be saved.
2 Clear the data
When in Checking interface,press “ZERO” button above 4 seconds,all the data will be removed,the “MEM” will disappear.
3 Connect the computer introduce
a. Using CD《The data export program》to output the stored data to computer. Checking, printing,testing times, average value, Max. Value, Min. Value, to identify whether test results conform to the requirements.(see details in 《The data export program》)
b. Using CD《The synchronous test》to implement graph of force value and time. (see details in 《The synchronous test》)
11. Safety Precautions
1 Notice:
a. It should be charged 4-6 hours later then could be used after purchased the instrument.
b. The users must use the RS232 connection lines which allotted by our company.
c. The instrument may damaged by wrong operation. This manual point out the ways to prevent it from damage, so please read it carefully and keep it well after reading.
d. If it is testing impact load, please choose the twice bigger force models of the required maximum impact load.
2 Warning:
a. Please make any safeguard during testing, such as wear protecting mask and glove.
b. Don't use the damaged clamps. Custom clamps please reference related parameters of the manual. (We also produce many kinds of clamps, the users could purchase as they request)
c. Please don't use the instrument if the actual value exceed the full scale, or the sensor would be damaged and make any accident.
d. When the testing value exceed 100% of the full scale, the instrument will be warning automatically, in this case, please quickly release the load or reduce the load.When the testing value exceed 120% of the full scale, the instrument may be damaged.
3 Solve the problem of system halted: When the system was halted, please use an pointer to press the "reset" button( on the left side of the instrument). Then it would be OK.
4 Safety Precautions
a. Please use the matched charger when it's need to charge, or it may case any circuit fault and fire hazard.
b. Don't use the other charger which the voltage is out of the rated voltage. or it may case any electric shock and fire hazard.
c. Don't pull out or insert the plug with wet hands,may cause electric shock.
d. Don't drag the wire of the charger to pull out the plug.
e. Please use soft cloth to clean the instrument, don't use any volatile chemicals to clean the instrument.(such as volatile agent, thinner, alcohol, etc.)
f. Please don't use the instrument at the following place:
① Wet place ② Dusty place ③Somewhere with much oil or chemicals ④ seismic place
g. Please use and restore it with the place of provision temperature and humidity, or it may be damaged.
h. Don't repair it by yourself, or it may case the machine permanent fault.
i. Please confirmed the fault before sending for repair.
j. The confirmation of project before repairing
Power | symptom | Cause or phenomenon | Treatment |
Press power on key has no display | Batteries has no electricity | Recharge | |
Can't charge | Converter of un-conformity when charging | Please affirm: AC110V→DC9.4V AC220V→DC9.4V | |
Indicator not on when charging | The battery is low,need a charging time of awakening | When the indicator not on,you can charge about 30 minutes.If the instrument is okay,the indicator will be on. | |
Testing value | Inaccurate testing value | Error is too big | Should be returned to the factory correction |
Other | Accident System halted | Has no reflection by pressing any key | Press "reset"key |
12. Data interface (9PIN)
PIN | Function |
PIN4 PIN5 | Contact Point Signal |
PIN2 PIN3 PIN5 | RS232 interface to computer |
13. Outline and mounting dimension chart
14. Packing list
Charger | Compressed clamp | Stretching clamp | Extended bar | Mounting screw | Manual | Inspection certificate | |
2 | 1 | 4 | 1 | 1 | 4 | 1 | 1 |
3 | 1 | 4 | 1 | 1 | 4 | 1 | 1 |
5 | 1 | 4 | 1 | 1 | 4 | 1 | 1 |
10 | 1 | 4 | 1 | 1 | 4 | 1 | 1 |
20 | 1 | 4 | 1 | 1 | 4 | 1 | 1 |
30 | 1 | 4 | 1 | 1 | 4 | 1 | 1 |
50 | 1 | 4 | 1 | 1 | 4 | 1 | 1 |
100 | 1 | 4 | 1 | 1 | 4 | 1 | 1 |
200 | 1 | 4 | 1 | 1 | 4 | 1 | 1 |
300 | 1 | 4 | 1 | 1 | 4 | 1 | 1 |
500 | 1 | 4 | 1 | 1 | 4 | 1 | 1 |
1000 (built-in) | 1 | 4 | 1 | 1 | 4 | 1 | 1 |
1000(external) | 1 | 3 | 2 | - | 4 | 1 | 1 |
2000 | 1 | 3 | 2 | - | 4 | 1 | 1 |
3000 | 1 | 3 | 2 | - | 4 | 1 | 1 |
5000 | 1 | 3 | 2 | - | 4 | 1 | 1 |
10K | 1 | 3 | 2 | - | 4 | 1 | 1 |
20K | 1 | 3 | 2 | - | 4 | 1 | 1 |
30K | 1 | 3 | 2 | - | 4 | 1 | 1 |
50K | 1 | 3 | 2 | - | 4 | 1 | 1 |
100K | 1 | - | - | - | 4 | 1 | 1 |
200K | 1 | - | - | - | 4 | 1 | 1 |
300K | 1 | - | - | - | 4 | 1 | 1 |
500K | 1 | - | - | - | 4 | 1 | 1 |
1000K | 1 | - | - | - | 4 | 1 | 1 |
2000K | 1 | - | - | - | 4 | 1 | 1 |


